Web Scraping
Web Scraping with Selenium Module and Python - Automatic Shopping Application with Stock Control
Hello everyone. Today I will share my research and work on web-scraping that I have been curious about recently. Web-scraping is a field where we can trigger and manage events on different websites using programs. When I explored it a bit, many project ideas that could be integrated into daily life came to mind, and I decided to make small-scale experiments. This gave me the opportunity to learn and use the Selenium module. Now I will show you some small information and tips about the Selenium module, and then explain the Automatic Shopping with Stock Control project I developed.
What is Selenium?
Selenium is a module that allows us to control different websites in different browsers through programs. It can be written in languages like Java, Python, CSharp, Ruby, JavaScript, Kotlin. With the program we write, we can automatically handle all the operations we do manually. Click events, form filling, email sending... In short, it's a useful module that can do all the operations a human can do on a website. To use Selenium, we need to install the driver for the browser we use/will use on our computer. You can download it from here. Since I use Chrome, I downloaded Chrome's driver. When downloading, you need to select the version that matches your browser version. After downloading, let's move the .exe file to an easily accessible folder like C:/Windows. With the driver we obtained, we can now open a new and clean page...
Now let's proceed step by step. I will use Python Anaconda for package management and all other advantageous privileges, and I will do my development using Jupyter Notebook. First, let's create an environment to try simple examples and download the necessary packages step by step. Now let's create an environment called testenv with conda. For this, let's open Anaconda Prompt and write the following command.
conda create -n myenv python=3.6
Now let's activate the environment we created:
conda activate testenv
After this, let's do these steps to add the environments we created to Jupyter notebook and start our development:
conda install -c anaconda ipykernel
python -m ipykernel kurulumu --user --name = testenv
First, we need to download the module to use Selenium features. Since we use Anaconda for modules and libraries, we download with conda install:
conda install -c conda-forge selenium
We can download all the libraries and packages we need besides Selenium with conda install. We can also find download commands suitable for the package we want from Anaconda's official website. Then we need to define this module at the beginning of the program. The path we define in the driver is the path of the driver we downloaded.
from selenium import webdriver
driver = webdriver.Chrome('C:\Windows\chromedriver')
When we run it, a blank Chrome tab will open. We can redirect to the site we want on the opened tab:
driver.get('https://www.google.com/')We can also use the close event to close the opened tab:
driver.close()So far we have only seen how to run the driver. But the real issue is being able to perform operations in the opened windows. For this, we need to capture the elements on the pages. We can do this with different methods.
Methods for Capturing Elements in the Opened Window
When working on pages, there are methods to capture elements on the page. These expressions work when the page is fully loaded. Methods used to capture elements are:
- ID
- Class Name
- CSS Selector
- Name
- Xpath
- Linktext
- Partial Linktext
- Tag Name
- DOM Locator
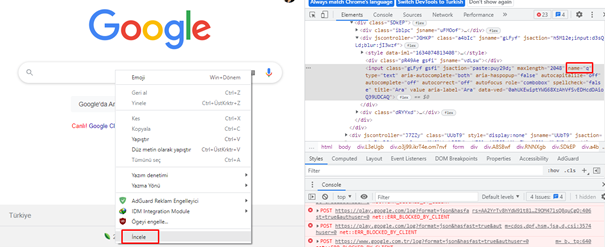
To look at the usage patterns, if we continue with our example, when we open the Google page, the area where we will search is the search-box area and we need to find this search-box area and enter text. For this, we can click on the element of the site that we need and view the page source to find information about the area. After finding the search area, I can search by entering the text I want.
search_box = driver.find_element_by_name('q')Here we can capture the search-box with the unique name attribute in the specified tag. After capturing this element, I can now do any search.
search_box.send_keys('Seher Gürel')
search_box.submit()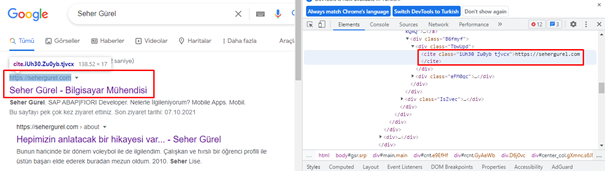
When we look at the most relevant first search result in any search, we see that it is between cite tags. We can use this way to access the first tab:
results = driver.find_element_by_tag_name("cite").click() So far we have seen to some extent how we do search and click events on a website. Now let's run our entire code and look at the operation:
from selenium import webdriver
driver = webdriver.Chrome('C:\Windows\chromedriver')
driver.get('https://www.google.com/')
search_box = driver.find_element_by_name('q')
search_box.send_keys('Seher Gürel')
search_box.submit()
results = driver.find_element_by_tag_name("cite").click()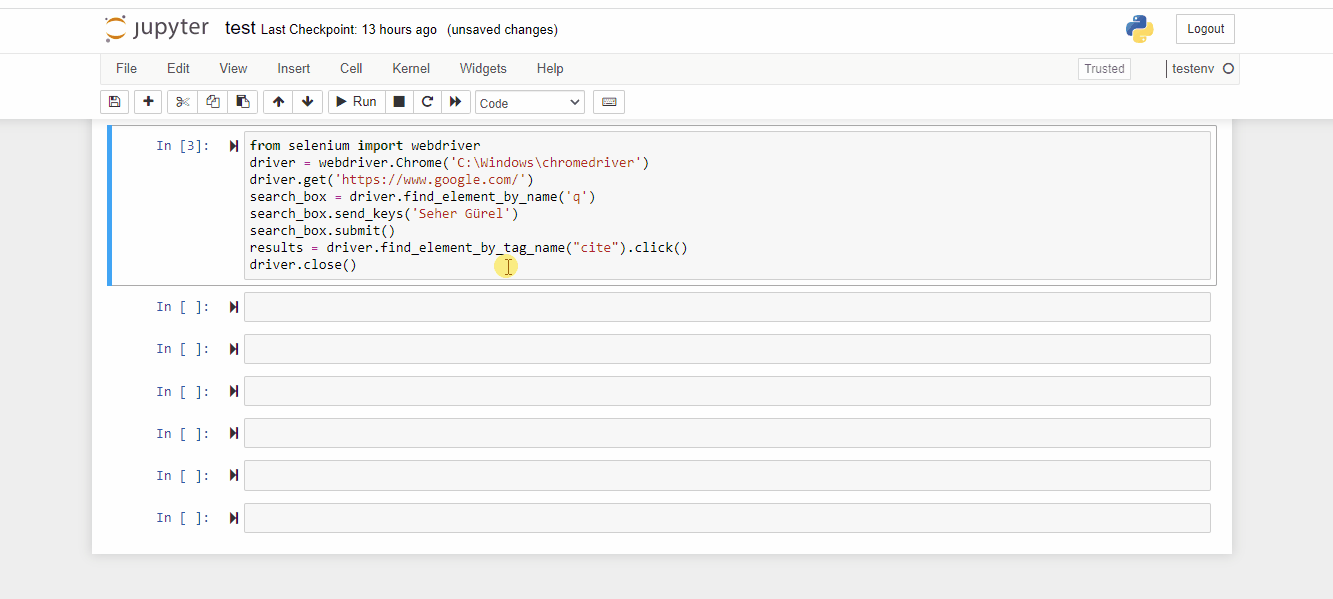
Aslında bir site ile ilgili işlemleri yaptığımız aramalar ve içindeki tıklamalarla hallettiğimizi göz önüne alınca doğru yönlendirmeler ile iş yükünün çoğunu yapmış oluyoruz. Bunların haricinde kendi projemde kullanmış olduğum mail gönderme işlemine bakalım.
Mail özelliklerini kullanabilmek için ilk olarak smtplib kütüphanesini import ediyoruz:
import smtplibDaha sonra bir gönderici ve alıcı bildirmemiz gerek. Ben ikisine de kendi mailimi yazarak testlerimi yapıyorum:
gmail_user = "xxxxx@xxx.com"
gmail_pwd = "xxxxx"
TO = 'xxxxx@xxx.com'
Burdan sonra da mail konusunu ve içeriğini belirttiğimiz bloğu tamamlıyoruz:
SUBJECT = "Test Subject"
TEXT = “This is test message.”
server = smtplib.SMTP('smtp.gmail.com', 587)
server.ehlo()
server.starttls()
server.login(gmail_user, gmail_pwd)
BODY = '\r\n'.join(['To: %s' % TO,
    'From: %s' % gmail_user,
    'Subject: %s' % SUBJECT,
    '', TEXT])
Mail objelerinde Türkçe karakterler kullanabilmek için encode yapmamız gerekli:
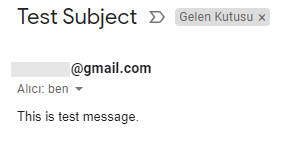
server.sendmail(gmail_user, [TO], BODY.encode('utf-8')) Bu kod bloğunu çalıştırdığımızda resimdeki gibi mail sorunsuz şekilde gelecektir.
Wait Types: Implicit – Explicit Wait
Bir sayfa yüklenirken bazen gecikmeler olabiliyor. Beklenen sürenin üstünde yükleme gerçekleşmezse web driver hata verebilir. Implicit wait ile bir elementi ararken hata atmadan önce web driver’ı verdiğimiz zaman kadar bekletebiliriz. Verilen zamanın üstünde sayfa yüklenmezse ancak o zaman hata alırız. Implicit Wait metotu iki parametre alır. İlk parametre zamanın tamsayı olarak değeri, ikinci parametre ise zamanın saniye, dakika, milisaniye cinsinden türüdür.
Implicit Wait Syntax:driver.manage().timeouts.implicitWait(10, TimeUnit.seconds) Explicit wait ise bizim erişmek istediğimiz öğeye uygulanır. Bu tarz zaman alacak sayfa yüklemelerinde genel olarak explicit wait kullanılır. Bulunmasını istediğimiz element için Expected Conditions belirterek bu metodu kullanıyoruz:
Explicit Wait Syntax:wait.until(EC.visibility_of_element_located(By.XPATH, "//someXPATH"))Pencereler Arasında Nasıl Geçiş Yaparım?
Bir web sitesinde çalışırken, işlemler yapacağımız yeni pencereler açmamız gerekebilir. Bunun için pencereler arasında geçiş yapmalıyız. Olay kontrollerini değiştirmemiz ve gerekli işlemi yapmamız gerektiği halde işlem odağı ana pencerede kalıyor. Ana pencereden yönlendiğimiz bir sayfada işlem yapamıyorsak sonraki adımı yeni bir pencere açarak devam edebilmemiz için pencereler arası geçiş yöntemini kullanırız:
#Go to new window
new_window = driver.window_handles[-1]
driver.switch_to_window(new_window)

#To get back to the first window
old_window = driver.window_handles[0]
driver.switch_to_window(old_window)
Automatic Shopping Application with Stock Control
I want to briefly introduce the project I made with the information we have gained so far. The basic purpose of the project is; if the desired product is not in stock, it checks and detects when the stock is renewed and buys directly without manual operation. When the process is completed, the user is informed by email. Now let's examine the images of the application with step-by-step stages.
First, I start the driver and open the page of the relevant shopping site:
from selenium import webdriver
import smtplib
driver = webdriver.Chrome('C:\Windows\chromedriver')
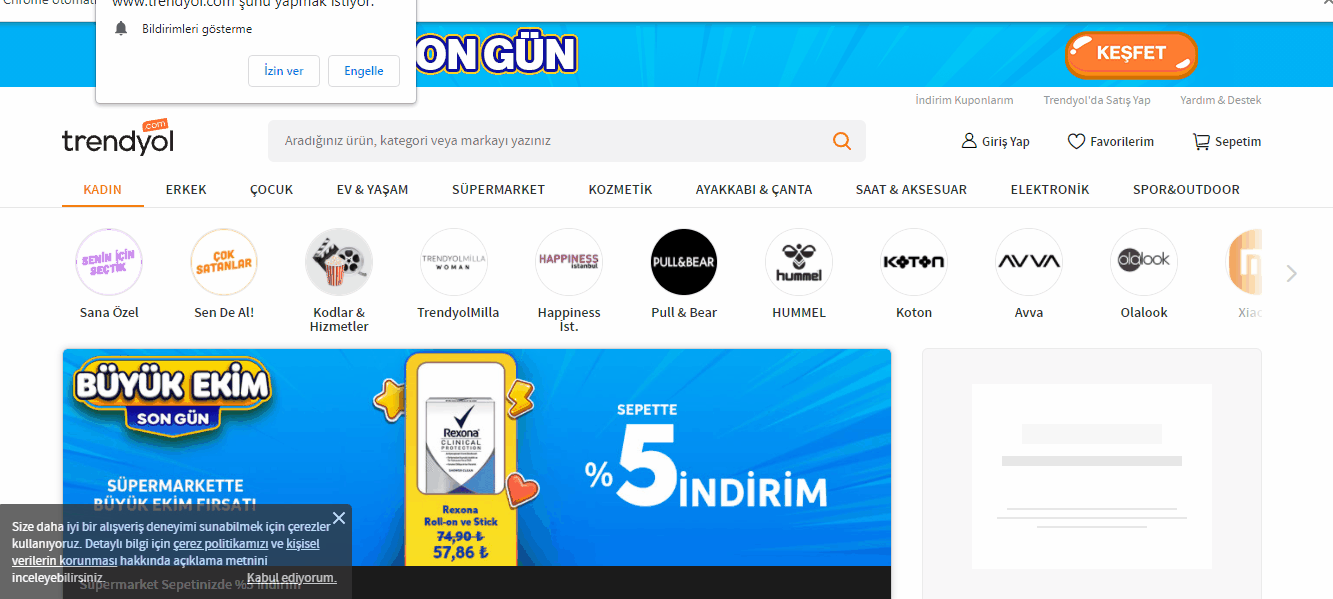
driver.get('https://www.trendyol.com/butik/liste/1/kadin');Elementleri doğru bir şekilde yakalayabilmek için sayfayı maximum boyuta ayarlamamız uygun olacaktır.
driver.maximize_window()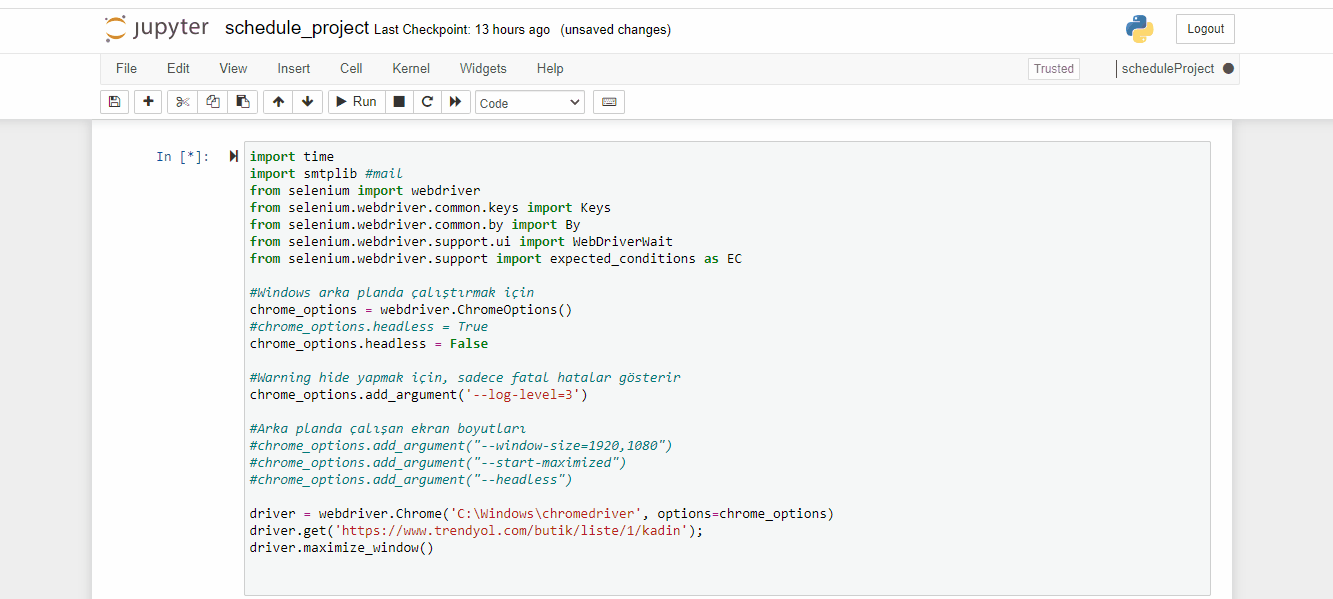
Açılan sayfanın arama kutusunu yakalıyorum. Arama yapmadan önce kutucuğu temizlemekte fayda var.
search_bar = driver.find_element_by_class_name("search-box")
search_bar.clear()
Benzersiz bir sonuç elde etmek için istediğim ürünün kodunu ve rengini yazarak arama yapıyorum.
search_bar.send_keys("04751303 Bej")
search_bar.send_keys(Keys.RETURN)
productResult = driver.find_element_by_class_name("prdct-desc-cntnr-name").click()İstediğim bedene ait path’i bulup tıklıyorum.
value = wait.until(EC.visibility_of_element_located((By.XPATH, "//div[@class='variants']//div[text()='S']")))
value.click()
Sepete eklemek için butonu yakalıyorum. Farklı bir pencere açtığım için kontrolü Explicit Wait ile yapıyorum. Wait özelliği kullanabilmek için gerekli kütüphaneleri eklemeyi unutmuyorum.
from selenium.webdriver.common.by import By
from selenium.webdriver.support.ui import WebDriverWait
from selenium.webdriver.support import expected_conditions as EC
button = wait.until(EC.visibility_of_element_located((By.XPATH, "//*[@id='product-detail-app']/div/div[3]/div[1]/div[2]/div[5]/button")))
Sonrasında ürünün stokta olup olmadığını öğrenmem gerek. Eğer ürün stokta varsa “Sepete Ekle” butonu çıkıyor. Ürün stokta yoksa farklı bir buton çıkıyor. Ben de buradan ilerleyerek buton ismine göre bir koşul belirledim.
if button.text == "Sepete Ekle":
  print("Ürün stokta var!")
else:
  print("Ürün stokta yok!")
Buradan sonra ürün stokta yoksa stok yenilenip satın alma işlemi tamamlanana kadar program belli aralıklarla devam edecek. Ürün stokta ise sırayla kullanıcıya mail gidecek, sipariş bilgileri girilecek ve satın alma işlemi tamamlanacak.
Burada ürün stokta var ise satın alma işlemi kullanıcıya mail olarak bildiriliyor. Göndericiye de alıcıya da kendi mailimi girerek testlerimi yapıyorum.
gmail_user = "xxx@xxx.com"
gmail_pwd = "xxx"
TO = 'xxx@xxx.com'
SUBJECT = "Trendyol seçili ürün stoğu hakkında"
TEXT = "Trendyol'da seçmiş olduğunuz ürünün stoğu güncellenmiştir. Talebiniz doğrultusunda satın alınacaktır."
server = smtplib.SMTP('smtp.gmail.com', 587)
server.ehlo()
server.starttls()
server.login(gmail_user, gmail_pwd)
BODY = '\r\n'.join(['To: %s' % TO,
        'From: %s' % gmail_user,
        'Subject: %s' % SUBJECT,
        '', TEXT])

server.sendmail(gmail_user, [TO], BODY.encode('utf-8'))
print ('Mail gönderildi!')
Sepete eklemek için butonun benzersiz name’ini belirten yolu kullandım.
addBasket = driver.find_element_by_class_name("add-to-basket-button-text").click()Eklediğim ürünü görmek ve onaylamak için sepete gidiyorum. Buralarda da ilgili butonların path’lerini kullanarak ilerliyorum.
basket = wait.until(EC.visibility_of_element_located((By.XPATH, "//*[@id='account-navigation-container']/div/div[2]/a/p"))).click()
basketConfirm = wait.until(EC.visibility_of_element_located((By.XPATH, "//*[@id='pb-container']/aside/div/div[1]/a/span"))).click()
Sepeti onayladığım anda sayfa bizi kullanıcı giriş ekranına yönlendirecek. Burada site kullanıcı giriş bilgilerini giriyorum.
mail_box = driver.find_element_by_id("login-email")
mail_box.clear()
mail_box.send_keys('xxx@xxx.com')
mail_box.submit()
pass_box = driver.find_element_by_id("login-password-input")
pass_box.clear()
pass_box.send_keys('xxx')
pass_box.submit()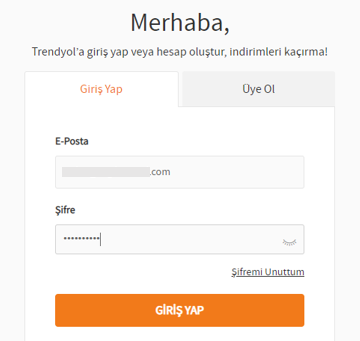
İstediğimiz adres bilgisinin path’ini işaretliyip kaydediyorum.
radioAddress = wait.until(EC.visibility_of_element_located((By.XPATH, "//*[@id='shippingAddress']/ul/li[5]/h3"))).click()
save = wait.until(EC.visibility_of_element_located((By.XPATH, "//*[@id='CheckoutAside']/section[5]/a"))).click()
Ödeme için daha önceden kayıtlı istediğim kartın bilgilerinin olduğu radio button’u ve sözleşme şartlarını kabul edeceğim chechbox’ı işaretleyip siparişi tamamlıyorum. Böylece satın alma işlemini tamamlamış oluyorum.
radioCard = wait.until(EC.visibility_of_element_located((By.XPATH, "//*[@id='creditCardPage']/div[1]/div[3]/div[2]/div/label/div[2]"))).click()
checkbox = driver.find_element_by_xpath("//*[@id='CheckoutAside']/section[3]/div[1]/label").click()
pay = wait.until(EC.visibility_of_element_located((By.XPATH, "//*[@id='CheckoutAside']/section[6]/a"))).click()
I showed the basic steps in the application one by one. Now let's see how to automatically run our application at certain time intervals with Windows Task Scheduler.
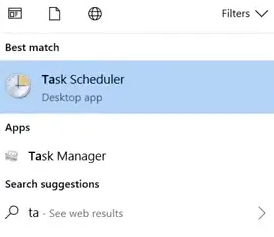
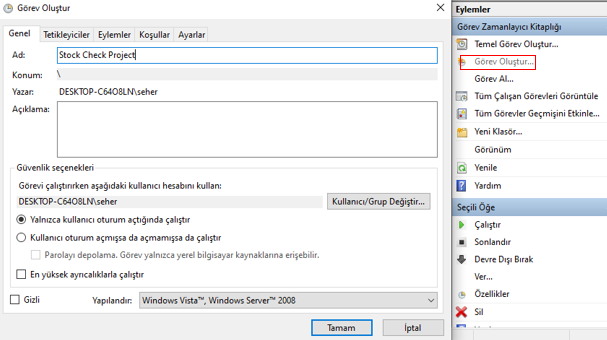
First, let's open Windows Task Scheduler.
On the screen we opened, we will click on the Create Task option. We will perform the following steps in order by entering a Task name.
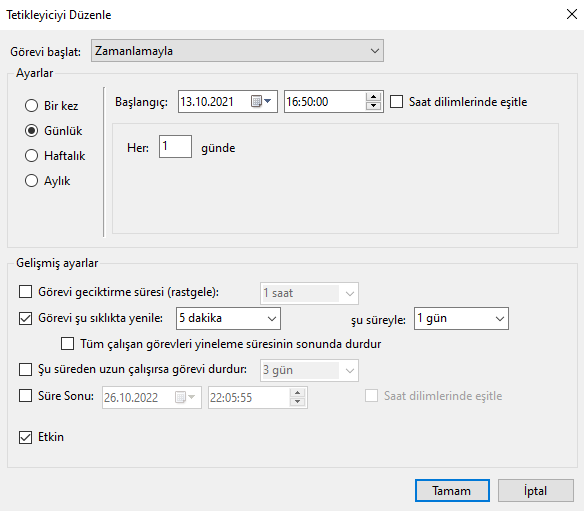
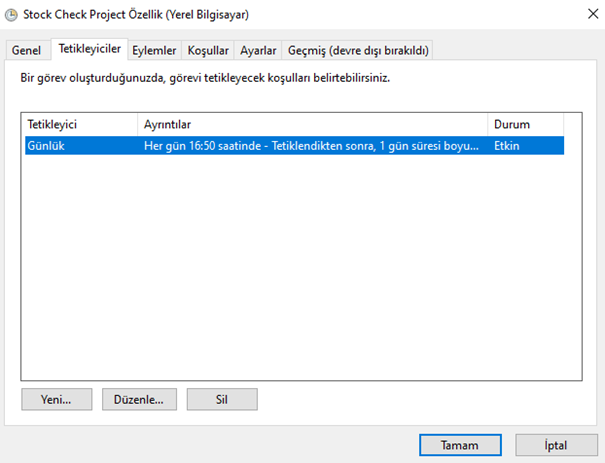
Tetikleyiciler:
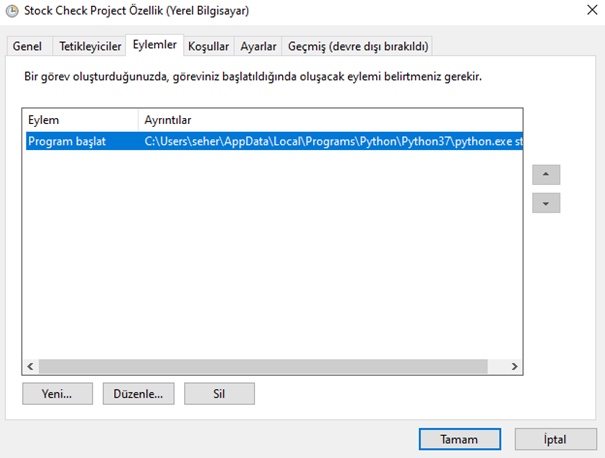
Eylemler’de doldurulması gereken bazı alanlar var. Onları bu şekilde doluduruyoruz:
Program/komut dosyasına python.exe dosyasının yolunu yazalım:
C:\Users\seher\AppData\Local\Programs\Python\Python37\python.exeBağımsız değişkenler ekle(isteğe bağlı) alanına projenin adını yazalım:
stock_check.pyBaşlangıç(isteğe bağlı) alanına projemizin dosya yolunu yazalım:
C:\Users\seher\OneDrive\Belgeler\Python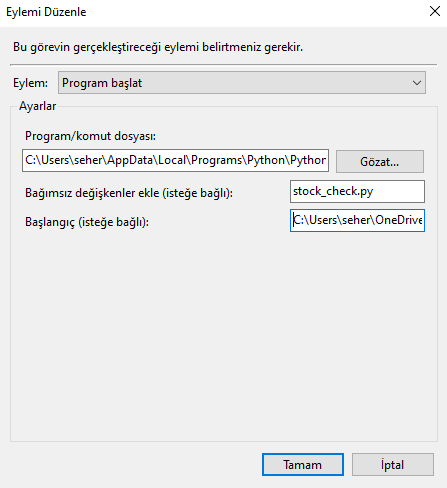
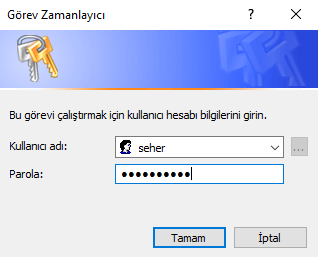
Tamam dedikten sonra açılan pop-up’da Microsoft hesabımızın şifresini yazalım:
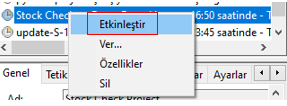
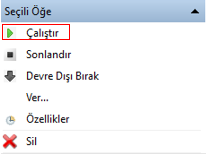
Bu işlemler bitince oluşturduğumuz Task Scheduler’i etkinleştirip çalıştıralım:

Böylece bilgisayarımızı her açtığımızda belirli zaman aralıklarında uygulamamız çalışacak ve ürün stoğu güncellendiğinde otomatik olarak satın alma işlemini bizim yerimize yapacaktır. Task Schedule oluşturma yöntemlerinden birisi bu şekilde. Tabi ki çok daha farklı yöntemler ile zamanlayıcı oluşturarak uygulamamızı belirli zaman aralıklarında çalıştırabiliriz.
Today I gave you information about the application I developed using Python, Selenium Module and Windows Task Schedule. I hope it was a useful article. See you at a different time with new information.
← Back to TECHNOBLOG